Migrate to AWS - Make a static website using S3, Cloudfront and Route 53
A few months ago I started studying most of the Amazon Web Services (AWS) and as I said in a previous post one of my goals for this year is to transition all my apps and microservices into AWS.
This tutorial is the first part of a series and explains in detail how to setup a static website with unlimited throughput, durability and availability using Amazon S3. Additionally, we exploit Amazon Cloudfront to provide caching and super-fast downloads all over the world and finally, we use Route 53 to serve the website behind our custom domain name (e.g. lambrospetrou.com).
The reason I decided to write this post is because although the documentation in AWS is very good, the majority of all the articles and threads in several forums are a bit outdated and do not cover the new features of the AWS services we are going to use. For example, Cloudfront’s ability to serve GZIP-ed compressed content and its free HTTPS support. The reason is that Amazon releases hundreds of features every year and it is impossible for everyone to catch-up ;)
I will try to structure this tutorial in a way that each part is self-contained and builds upon the previous part, in order to allow you to pick-and-choose only the parts that you want for your website.
Overview
The most important service when it comes to static content is Amazon S3, which stands for Simple Storage Service. This is one of the best web services available as of this moment and not just among Amazon’s offerings but other competitors’ too. It is a file storage solution that offers super high-availability, extreme durability (eleven nines, 99.999999999%) and it is very cheap. Amazon S3 alone allows you to have a proper static website ready in a few minutes.
The other two services, Cloudfront and Route 53 are going to extend our website to provide caching in edge locations all over the world, to allow users to download the files from locations closer to them, and with Route 53 we will allow the usage of custom domains instead of using the default AWS ones (e.g. lambrospetrou.com.s3-website-region.amazonaws.com).
Make a static website using Amazon S3
Before we dive into the step-by-step guide let’s create our scenario.
Assume that throughout this tutorial we want to make a website for lambrospetrou.com. Also we want the www-prefixed domain, www.lambrospetrou.com to redirect the users to the APEX domain, the non-www domain, lambrospetrou.com.
First we want to create the bucket that will hold our website files. Visit the AWS management console and navigate to the S3 service. (direct link to S3).
Click Create Bucket and type in the Bucket Name, which in my case it was
lambrospetrou.com. It is very important that you give your bucket a name that matches exactly your domain. Additionally, choose the region where you want your bucket to reside (choose the one closer to your users).Click Create and your new bucket should be visible under the list of All Buckets.
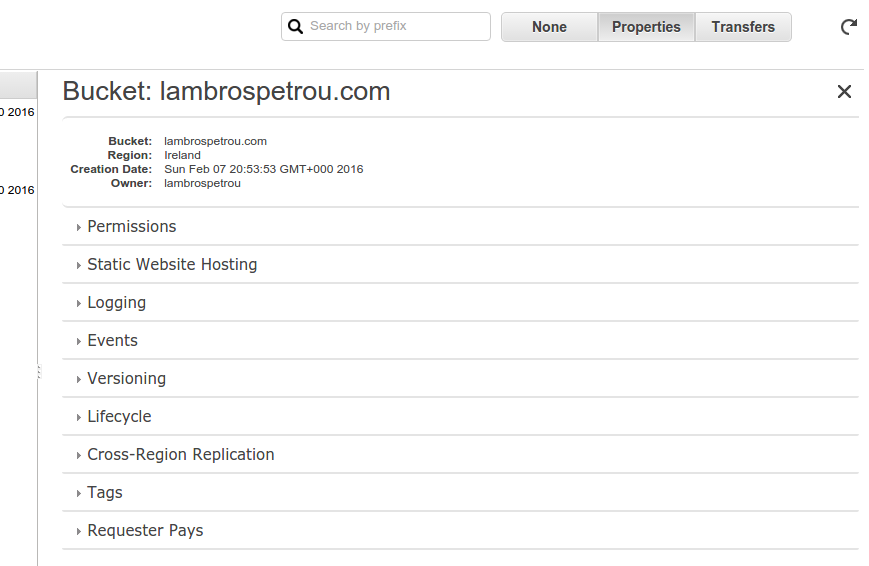
Now click on the bucket you just created and select Properties from the tabs in the right side of the dashboard (you should see options like the picture below).
The next step is to make this bucket act like a website.
- Click on the Static Website Hosting option and select Enable Website hosting.
- Type index.html in the Index Document option (and optionally fill the Error Document option if you plan to have an error page.). This option specifies that when a user navigates to a directory we want the index.html file of that website to be downloaded.
- Click Save.
Now the last step is to add permissions to the bucket to allow anyone to access its files.
- Click the Permissions option.
- Click Add bucket policy and paste in the following snippet (remember to replace
lambrospetrou.comwith your bucket’s name):
{ "Version": "2012-10-17", "Statement": [ { "Effect": "Allow", "Principal": "*", "Action": "s3:GetObject", "Resource": "arn:aws:s3:::lambrospetrou.com/*" } ] }- Click Add CORS Configuration and paste in the following snippet:
<?xml version="1.0" encoding="UTF-8"?> <CORSConfiguration xmlns="https://s3.amazonaws.com/doc/2006-03-01/"> <CORSRule> <AllowedOrigin>*</AllowedOrigin> <AllowedMethod>GET</AllowedMethod> <MaxAgeSeconds>3000</MaxAgeSeconds> <AllowedHeader>Authorization</AllowedHeader> </CORSRule> </CORSConfiguration>- Click Save. The above snippets allow everyone to request all files inside this bucket.
That’s it! You have now a working website without the need to provision any server or any other infrastructure to support your static website. Whatever you upload in this bucket is going to be accessible from all over the world and rest assured that your website will always be online ;)
The link to use in order to access your website is under the Static Website Hosting option, where it says Endpoint. It should be something similar to
lambrospetrou.com.s3-website-region.amazonaws.com. I will refer to this endpoint throughout the rest of the tutorial as S3-Endpoint, so take a note of it.Try to open that link using your browser. Of course you will see nothing since you haven’t uploaded anything to your bucket yet ;p
Make the www-subdomain to redirect to the APEX domain
In this section I will describe how we can make all requests to www.lambrospetrou.com to be redirected to lambrospetrou.com. Again we only need to use Amazon S3 for this part. The idea is very simple. We will create another bucket named www.lambrospetrou.com but now instead of putting files into this bucket we will specify redirection rules to the bucket we created before.
Create another bucket following the previous steps 1-4 but this time use the www-prefixed domain (e.g.
www.lambrospetrou.com) as the bucket name.The next step is to add the redirection rules.
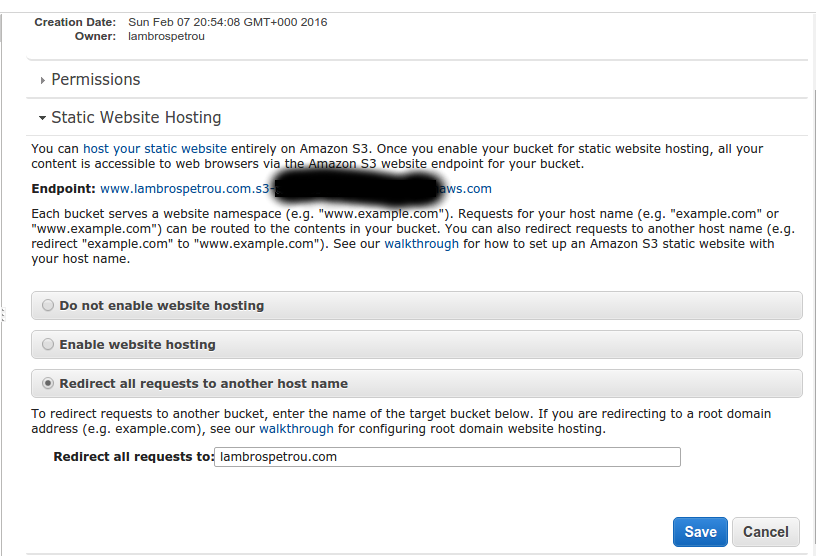
- Click the Static Website Hosting option.
- Select Redirect all requests to another host name
- Fill the input box named Redirect all requests to: with your non-www domain name, which is also the bucket name your created before (e.g.
lambrospetrou.comlike the picture below).
- Click Save
Finished!
Test your website
Upload your website to the non-www bucket you created first, or just create an
index.htmlfile with the following snippet:<html> <head> <title>Awesome website on AWS S3</title> </head> <body> <h1>Hello world!</h1> </body> </html>Try to access your website using your S3-Endpoint (
lambrospetrou.com.s3-website-region.amazonaws.com). You should see your website, if not there is a problem so contact me if you cannot figure out what step went wrong.Try to access your www-prefixed endpoint and make sure that you are redirected to the non-www one.
Use a custom domain with our website instead of the Amazon S3 endpoints
In this section, I will describe how you can use your domain name (e.g. lambrospetrou.com) to point to your website on S3 using Route 53, which is Amazon’s DNS solution offering.
Register your domain with any registrar or Route 53 itself if you do not have a domain in hand.
Open the Route 53 management console (direct link).
Click Hosted zones from the left navigation menu.
Click Create Hosted Zone in order to setup our domain.
- For Domain Name you have to specify the non-www domain (e.g.
lambrospetrou.com) - Click Create
- For Domain Name you have to specify the non-www domain (e.g.
Open the hosted zone you just created and make sure that it has the NS and SOA record sets.
Now you have to set the nameservers of your domain to the servers specified under the NS record. This is required only if your registrar is not Route 53. You can continue with the tutorial but in order for you to be able to see the changes you have to change the nameservers of your domain.
Now we have to creare a Record Set for our domain in order to point to the S3 bucket we created above.
- Click Create Record Set
- Leave the Name as blank (empty).
- Set the type to A - IPv4 address
- Select Alias - YES
- Type into the Alias Target your S3-Endpoint for your non-www bucket (e.g
lambrospetrou.com.s3-website-region.amazonaws.com). VERY IMPORTANT: do not select from the suggested targets, type the full S3-Endpoint yourself (I will explain later on why). If this gives you an error about an invalid value, i.eAlias target contains an invalid valuethen use the S3 website region endpoint for alias target, likes3-website-eu-west-1.amazonaws.com.(note the dot at the end!). - Click Create.
Repeat step 7 in order to create a Record Set for your www-prefixed domain but now you have to use www as the Name of the Record Set, and the www-prefixed S3-Endpoint as an Alias Target.
You should allow a few minutes (or hours) for your changes to propagate through the network and assuming that your successfully changed the nameservers of your domain you should be able to visit your naked domain,
lambrospetrou.com, and see your website as you would through the S3-Endpoint. Also, when you visit the www-prefixed domain you should be redirected to the naked one.
You can stop now if you want since you managed to create a static website that is very durable, highly-available, cheap, and that uses your custom domain. The rest of the tutorial will cover Amazon Cloudfront and how caching can affect your users all over the world.
Use Amazon Cloudfront to provide super-fast latencies all over the world
Again, we will use Cloudfront to provide a cache layer in front of our website for several reasons.
First of all, Cloudfront is a CDN (content delivery network) with edge locations scattered around the world which means that our users will always download the files from locations close to them avoiding long routing trips to the other side of the world (the location of your website is the region you specified during the S3 bucket creation).
In addition, Cloudfront is very useful because it allows us to use GZIP compression on most of the static files out-of-the-box, which is a new feature released in 2015 (related link).
Another very important advantage is that we can use HTTPS to access our website. By default S3 supports only HTTP requests through the custom domain, although using the S3-Endpoint allows for HTTPS. With Cloudfront we can use HTTPS from the user to AWS and then Cloudfront internally will use HTTP to communicate with S3 and return the content back to the user over HTTPS again. This feature in conjuction with the fact that now Cloudfront can be associated with an Amazon SSL key allows us to use HTTPS for Free. Both features were released in January 2016 (AWS Certificate Manager, Cloudfront Origin Security Features).
Let’s go ahead and create our first Cloudfront distribution.
Open the Cloudfront management console (direct link).
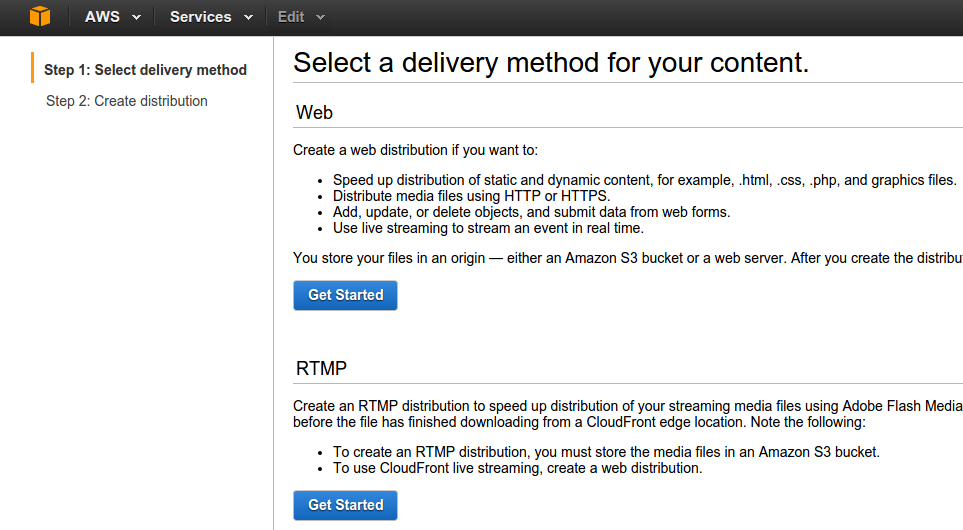
Click Create Distribution and then click Get Started under the Web section (see picture below).
Now you have to be very careful here.
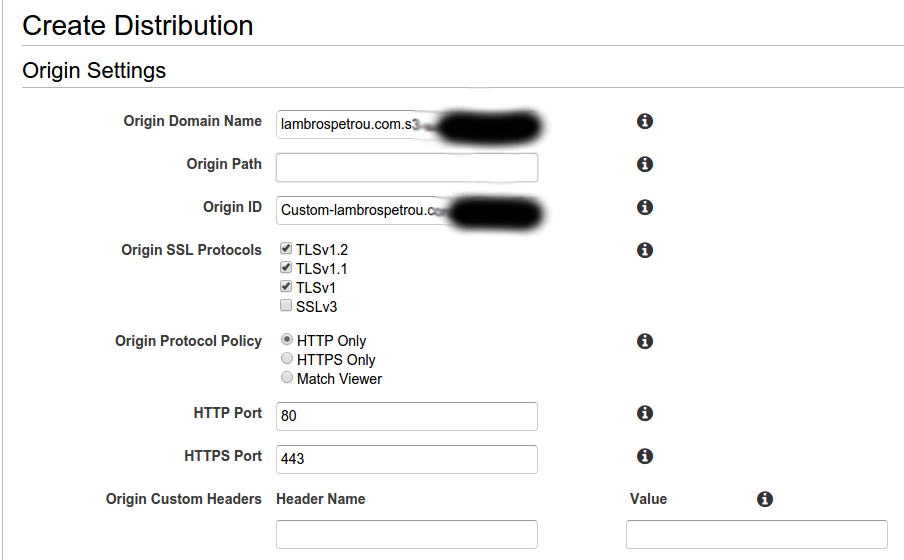
- Option Origin Domain Name should be set to the full S3-Endpoint of your non-www bucket (e.g.
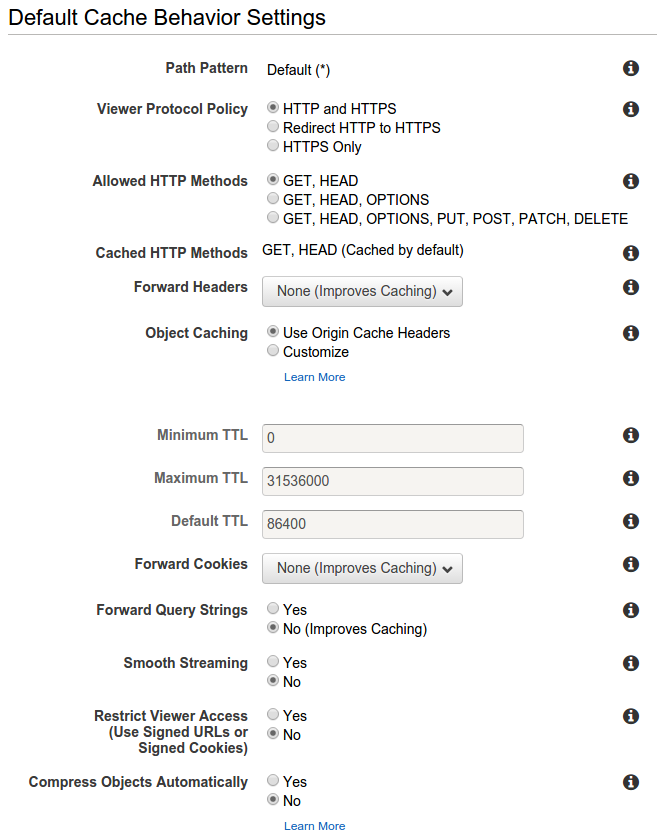
lambrospetrou.com.s3-website-region.amazonaws.com) - Leave the other options default for now since you can change these later as your website evolves (see two pictures below).
- The only option you might want to change for now is the Forward Query String depending on whether your website uses query strings from users. By default Cloudfront will just strip out the query string before forwarding the request to S3 so enable this if your want it.
- Additionally you will most probably want to enable the option Compress Objects Automatically since it will GZIP most of the static files, thus leading to even faster download times.
- Option Origin Domain Name should be set to the full S3-Endpoint of your non-www bucket (e.g.
In the Distribution Settings choose the Price Class you want depending on your user-base but bear in mind that the more edge locations you support the higher prices you pay.
In the Alternate Domain Names (CNAMEs) you have to write in the custom domain names you want to use to point to this distribution. In my case I just have the naked domain
lambrospetrou.com.The next step is to setup our HTTPS certificate (if you do not want HTTPS just skip this step and leave the defaults)
- Select Custom SSL Certificate under the SSL Certificate option.
- If you have already uploaded your own custom certificate to AWS use that, otherwise click Request an ACM certificate to get an Amazon certificate for free.
- In the opened page type in your naked and www-prefixed domains (e.g. both
lambrospetrou.comandwww.lambrospetrou.com, see picture below).
- Click Review and Request and make sure to confirm the certificate activation.
- Now you should be able to select the newly created certificate from the dropdown menu (sometimes you might have to refresh the page to make the certificate available to the dropdown)
Click Create Distribution and wait for the status to become Deployed instead of In Progress.
Once the distribution status is Deployed use the Domain Name of your distribution to access your website (e.g. xxxxxxxxxxxx.cloudfront.net). If we did everything right you should now be able to see the exact page as if you visited your website through your domain or through the S3-Endpoint.
Setup a Cloudfront distribution for the www-prefixed domain
Now we need to create another distribution for the www-prefixed domain in order to use the second bucket we created that just redirects to the first.
Repeat steps 1-6 but now use the www-prefixed domain in steps 3 and 5.
Once your distribution is deployed try to visit it using the distribution’s Domain Name and make sure that the redirection works properly.
Set your domain in Route 53 to point to Cloudfront distribution
The last step is to make our custom domains (e.g. lambrospetrou.com and www.lambrospetrou.com) point to the Cloudfront distributions rather than the S3 buckets directly.
Since we have already setup Record Sets in Route 53 we just need to update them.
Open the Route 53 management console (direct link).
Click Hosted Zones from the left navigation menu.
Select your domain hosted zone (e.g.
lambrospetrou.com)Click on the naked (non-www) domain record set and update the Alias Target now to have the Domain Name of the corresponding Cloudfront distribution (e.g.
xxxxxxxxxxx.cloudfront.net). Click Save Record Set.Repeat step 4 for the www-prefixed domain to use the second Cloudfront distribution.
Finally, Done!
Congratulations, you have created a website that is impossible to hack, it will always be available, it will always have exceptional performance, it is amazingly easy to update, you have HTTPS, you have GZIP compression for static files, you use your custom domain names and it should not cost you more than a few dollars (mainly for Cloudfront) unless you have billions of visitors, in which case I guess you make enough money with the content of the website ;)
The most interesting part of this architecture is that although this scenario uses entirely static websites, you can very easily extend this to support dynamic websites too and at the same time keep the caching layer for all the benefits it brings. You will just need to create another Cloudfront distribution that will handle a specific prefix of your domain, or even a subdomain, and which will point to your server (EC2, Elastic Load Balancer, etc.) in order to create the dynamic content of the website. This scenario and much more are explained in high detail in an amazing whitepaper by AWS which you can download for free named Hosting Static Websites on AWS. It covers the topics we implemented in this tutorial along with more advanced topics like A/B testing, user sharding, logging, security and many more.
I hope you liked the tutorial, but even if you did not I would really appreciate your feedback to improve it (I am pretty sure you can find where to send me a message).
Yes, my website at the moment (as of the time of this article) is hosted on S3, with Cloudfront distributions as defined above and Route 53 to handle my custom domain.
Notes
The reason that we use the full S3-Endpoint when we refer to it either from Cloudfront distributions or from Route 53 Record Sets is simple. When S3 acts like a website, like in our scenario, it handles automatically the redirects and the retrieval of index.html files when the request is done on a directory. In order to use these features when behind of a custom domain we have to use the full S3-Endpoint otherwise if we use the links suggested in the AWS documentation or those suggested form the dropdown menus in the console these features will not work.
You can play along with the caching behavior of Cloudfront distributions. With the default values, if you do not specify a Cache-Control header on an object in S3, the defaults are going to be used which based on the documentation use 1 day of caching. Depending on your website you can specify to cache for less time, forward query strings, forward custom headers or not, etc.
You can use the S3-Endpoint during development for easier testing since Cloudfront will serve the cached version to you which will annoy you during testing ;p Otherwise you can invalidate some files in your distribution, but even that takes time so think carefully about your caching technique (times, versionings, etc.) and use S3-Endpoints to ease up your dev process.
