AWS Elastic Beanstalk Go platform (AL2) — Deep Dive
Even though my default and preferred way of deploying applications is #serverless platforms, sometimes I need an actual long-running host. For example, some of the applications I run (e.g. Gitea) are written in Go and use SQLite as their database so in that case serverless does not work.
In this article I will explore the Elastic Beanstalk Go platform based on Amazon Linux 2 (AL2) for deploying a simple application. As a comparison, a couple of years ago I wrote about the older Go platform based on Amazon Linux 1.
Even though I focus on the Go platform, almost everything applies to all Amazon Linux 2 based platforms (e.g. Java). You can also use the Go platform to deploy any application that is compiled to a binary that can run on Amazon Linux 2 (e.g. Rust).
Disclaimer: All information shown is accurate as of Jan 30/2022.
Why use AWS Elastic Beanstalk?
Easy to begin, Impossible to outgrow.
Elastic Beanstalk is a Platform-as-a-Service (PaaS) service offering by AWS. It takes care of managing the platform updates, patching the underlying hosts, and abstracting away the AWS resources used while at the same time providing the necessary hooks and capabilities to customise and extend them when needed.
AWS Elastic Beanstalk is similar in “principle” to Azure App Service, or Google App Engine.
I personally like Elastic Beanstalk and is my first choice of deploying to actual hosts/VM instances. I usually use the single instance environment to get the benefits without the costs, but there is also the load-balanced environment which allows you to scale as much as you want.
Features the Go platform provides which I cannot find in another platform as of time of writing (see related tweet):
- single server instance only (because not everything is web-scale)
- persistent disk volumes (i.e. Amazon EBS)
- deployments in-place on same instance with only 1-2s of downtime
- restriction due to the persistent disk volume only being accessible from one host at a time
- managed platform: OS updates, host patching, language runtime updates
- variety of instance types, from the low-cost T3, to the powerful ARM-based Graviton2 C6g
- <5$/month
Overview
The Amazon Linux 2 based platforms were added back in 2020, and with that upgrade all the platforms now follow (almost) the same conventions and setup (see supported Linux platforms), which is a nice improvement over the previous platforms based on Amazon Linux 1 where each language had its own idiosyncracies.
The AWS documentation contains most of the things we need to know about the platforms but unfortunately as usual it’s like they intentionally try to make it hard on their users, and they spread the information across multiple pages. In this article I will try to cover the main features of the platform and link to the corresponding documentation pages to make it easier to find what we need. This is basically a reference for future me 😅
All AL2 platforms offer the following features (see documentation):
- Buildfile: one-off commands to run from inside the uploaded bundle, e.g. building the source code to create the binary to run.
- Procfile: long-running monitored commands to run, e.g. the web server.
- Platform hooks: one-off commands to run during the deployment lifecycle hooks (e.g. predeploy, postdeploy). New to AL2 based platforms.
- Reverse proxy configuration:
nginxis used as the reverse proxy for most platforms and there is a way to override its configuration. Some platforms also provide Apache HTTPD as proxy (e.g. Tomcat, Node.js, PHP, and Python). - Configuration files (.ebextensions): configuration to extend the Beanstalk environment. For example, add new CloudFormation resources (e.g. DynamoDB tables, EBS volumes), customise existing CloudFormation resources (e.g. the EC2 instance), override files on the filesystem, and many more.
Let’s go into details for each one of these for the Go platform specifically.
Buildfile
- https://docs.aws.amazon.com/elasticbeanstalk/latest/dg/go-buildfile.html
- https://docs.aws.amazon.com/elasticbeanstalk/latest/dg/platforms-linux-extend.html
The Buildfile file should be placed at the root of the uploaded bundle .zip file and contains one-off commands that we want to run as part of the build phase of the deployment. The working directory of each command is the root of the uploaded bundle. If your uploaded bundle contains your source code then this is where you would put your application compile command. If you have a Continuous Integration (CI) system to build your source code before-hand then you don’t need a Buildfile.
For example, the following Buildfile will compile the Go application and create a binary file named app into the bin/ directory:
cmd1: go build -o bin/app
The cmd1: part is nothing but just a name and does not have any meaning other than differentiating the commands to run. The following is also valid:
build: go build -o bin/app
check: ./validate-app-binary.sh
Personal opinion: I never use the Buildfile to build my application and I always have a CI system to build the source code (or even build it locally). Even the documentation itself suggests to use the predeploy platform hook (more later) instead for the one-off commands we want to run, so this is not really needed. This means that my uploaded bundle .zip file only contains the compiled artifacts, e.g. the bin/app binary from the above example. This makes deployments a bit faster as well since the build phase will not happen during the Beanstalk lifecycle and I don’t worry about my build process being constrained by the machine running the actual application. For example, if you have a lot of dependencies or your tests need a lot of resources then doing it before triggering a Beanstalk deployment will allow you to use smaller lightweight instances for the actual application in production (e.g. T3.nano, T4G.nano).
Procfile
- https://docs.aws.amazon.com/elasticbeanstalk/latest/dg/go-procfile.html
- https://docs.aws.amazon.com/elasticbeanstalk/latest/dg/platforms-linux-extend.html
The Go platform also supports conventions to automatically build and run your application, but I personally avoid them since they are less flexible than using Procfile and there is zero benefit in using them.
The Procfile file should be placed at the root of the uploaded bundle .zip file and contains the long-running commands that we want to run as part of the application. Each process started by these commands will be monitored by the environment and automatically restarted when they crash. This is the place where we specify the main command(s) to start the application.
For example, the following starts the bin/app and bin/bgapp apps with the right flags:
web: ./bin/app -name webapp
bgapp: ./bin/bgapp -name bgapp -port 5001
By default, Elastic Beanstalk listens to requests from the internet on HTTP port 80 and forwards them to port 5000 inside the host (configurable if needed). Therefore, the application should listen on port 5000. Elastic Beanstalk looks for the command named web from Procfile, and sets the PORT=5000 environment variable when running it. The application code will need to read that env variable when setting up its HTTP listener. We could also ignore the PORT env variable and hardcode port 5000 but it makes it harder to start your application on different ports (e.g. locally), so do the nice thing and read the env variable on startup (see example application code below).
NOTE1: The default port can be changed from 5000 to something else by using .ebextensions and setting the aws:elasticbeanstalk:application:environment.PORT property. Read more about this in the reverse proxy configuration docs (make sure to expand the “Reverse proxy configuration” section).
NOTE2: In the previous version of the platform (AL1) all processes in the Procfile were getting the PORT set to a value starting from 5000 and then growing in increments of +100. This does not apply anymore in AL2 platforms and only the explicitly named web process has the PORT env set, which is why I explicitly set the port for bgapp in the above example.
NOTE3: There are some nuances around logging and how the logs are streamed to CloudWatch Logs when Procfile contains more than the web process but we will explore those later.
Platform hooks
Platform hooks are a new addition to the AL2 based platforms. The only way to extend and customise Elastic Beanstalk before was using the .ebextensions configuration files but that was/is complicated and very error-prone (lots of trial-and-error needed 😓). Platform hooks cover 90% of all use-cases (personal guesstimate), and they make our lives much easier.
The Platform hooks (expand section) are basically script files placed inside the .platform/hooks directory, under one of the following sub-directories: prebuild, predeploy, postdeploy, depending when they need to run.
The scripts inside each of those directories run in order of their filename. For example, let’s examine the following directory structure:
$ ls .platform/hooks/**
.platform/hooks/postdeploy:
01-validate-http.sh  02-update-route53.sh

.platform/hooks/predeploy:
01-setup-ebs.sh
With the above files the script 01-setup-ebs.sh will be executed before the new version of the app is activated (predeploy), and the 01-validate-http.sh and 02-update-route53.sh scripts will run after the switch (postdeploy) in this specific order.
Config hooks
Apart from the .platform/hooks directory, there is also a .platform/confighooks directory supported. At first glance, the difference between the two is confusing. Even though the available hooks and execution rules are the same, the type of changes in a deployment will decide which hooks to trigger.
A configuration deployment occurs when you make configuration changes that only update environment instances without recreating them.
According to the docs the following changes trigger .platform/confighooks only:
- Environment properties and platform-specific settings
- Static files
- AWS X-Ray daemon
- Log storage and streaming
- Application port
NOTE: In order to make sure a script runs regardless of the type of changes it has to be placed in both .platform/confighooks and .platform/hooks.
Reverse Proxy configuration
All AL2 based platforms now are similar in the way their reverse proxy is configured, using nginx.
In order to customise the reverse proxy with our own nginx configuration we can use the .platform/nginx directory.
Any .conf configuration file inside the directory .platform/nginx/conf.d/ of the uploaded application source bundle will be included automatically by nginx during service startup.
I rarely have to modify the proxy configuration, and when I do it’s to adapt some of the default limits, e.g. concurrency connections, timeouts.
See nginx examples for what configuration is available, and the Multiple Procfile processes section below for how this can be used to proxy two servers running on the same host.
Advanced configuration files (.ebextensions)
- https://docs.aws.amazon.com/elasticbeanstalk/latest/dg/ebextensions.html
- https://docs.aws.amazon.com/elasticbeanstalk/latest/dg/command-options.html
- https://docs.aws.amazon.com/elasticbeanstalk/latest/dg/customize-containers-ec2.html
I am not going to dive deep into this one because it supports a massive amount of configuration, and should be the last option only if nothing else works.
Configuration files are useful when all the above features we discussed (Buildfile, Procfile, .platform/{confighooks/hooks}) do not support what we want. In this case they can be handy since they support almost anything.
- A configuration file needs to be placed inside the
.ebextensionsdirectory at the root of the uploaded.zipfile bundle, and should have the.configfile extension. - The configuration file structure is documented here and supports anything from installing
yumpackages, to putting files on the filesystem, to adding/overriding CloudFormation resources. - Read the above documentation pages in order to properly understand how
.ebextensionswork to avoid a lot of unnecessary head wall-hitting 🤕
Example of a configuration file (.ebextensions/awslogs.config) that configures the CloudWatch Logs agent to stream the /var/log/bgapp.stdout.log log file to CloudWatch Logs: https://gist.github.com/lambrospetrou/758a312a1317532eb6bb0960985df83e
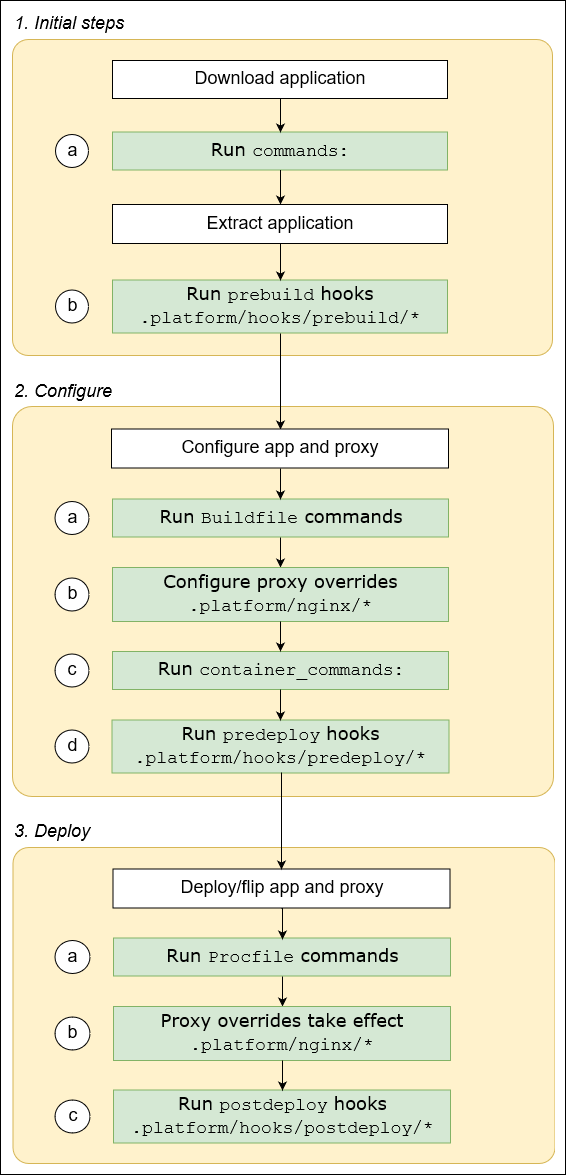
Instance deployment workflow
The documentation section I visit most often is the instance deployment workflow diagram.
Unfortunately, it’s not 100% complete since it’s not showing in detail how shutdown and termination of the current app is happening, but it covers everything else.
Credits for the following image belong to AWS but I am putting it here for completeness as well:
Example application
In this application we have a simple HTTP API written in Go. We don’t use any of the advanced configuration features of Elastic Beanstalk here just to show that things can be easy and simple.
- Full code available: https://github.com/lambrospetrou/aws-playground/tree/master/elastic-beanstalk-al2-go/single-process
I didn’t put a Buildfile in this application, so when we want to deploy we need to run make either locally or on our CI system, and then upload the bundle file located in build/bundle.zip.
This is how the directory structure looks like after running make:
➜  single-process git:(master) find . -type f
./app/go.mod
./app/main.go
./Makefile
./build/bin/app
./build/bundle.zip
./build/Procfile
./build-tools/Procfile
Procfile
web: ./bin/app -name web
Application code (main.go)
package main

import (
    "flag"
    "fmt"
    "html"
    "log"
    "net/http"
    "os"
    "strings"
)

func main() {
    name := flag.String("name", "app", "The name of the service running, e.g. web2")
    port := flag.String("port", os.Getenv("PORT"), "The port for the server to listen.")
    flag.Parse()
    if strings.TrimSpace(*port) == "" {
        *port = "5000"
    }

    http.HandleFunc("/", func(w http.ResponseWriter, r *http.Request) {
        msg := fmt.Sprintf("Service %s Path, %q", *name, html.EscapeString(r.URL.Path))
        log.Println(msg)
        fmt.Fprintf(w, msg)
    })
    log.Printf("App %s starts listening at :%s\n", *name, *port)
    log.Fatal(http.ListenAndServe(":"+*port, nil))
}
Notice how we read the PORT environment variable but also support command line arguments and then start our HTTP listener on the given port.
After deploying the above on Elastic Beanstalk and enabling CloudWatch Logs streaming we can see that automatically we get the following Log groups created and populated:
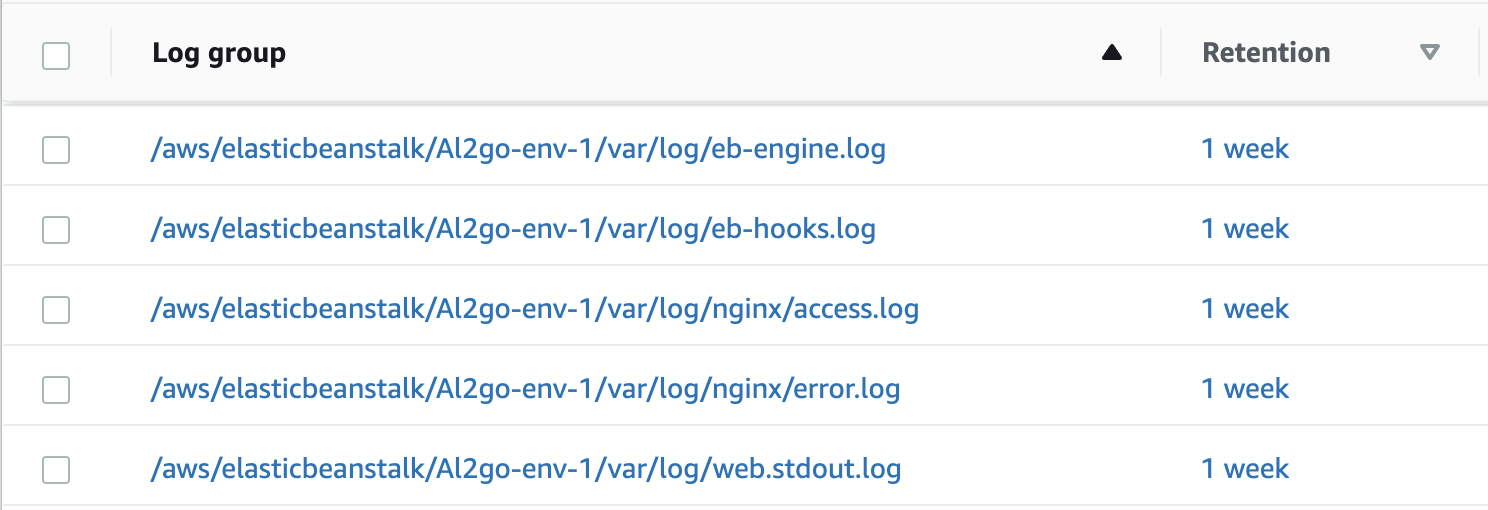
The /aws/elasticbeanstalk/Al2go-env-1/var/log/web.stdout.log log group contains the log lines from our application. The web prefix of the file corresponds to the web process name inside our Procfile.
The /aws/elasticbeanstalk/Al2go-env-1/var/log/eb-engine.log log group contains all logs from the Beanstalk processes that run during a deployment, which is useful while troubleshooting failed deployments or trying to understand how deployments work.
Elastic Beanstalk provides an endpoint for our application which corresponds to the HTTP port 80 mentioned in Procfile section above, and looks like http://al2go-env-1.eba-f2qnm2t6.eu-west-1.elasticbeanstalk.com/ where al2go-env-1 is the name of my environment. Unfortunately this endpoint is not HTTPS…
Multiple Procfile processes
In this section we have the same application as above, but this time I am starting it twice listening on different ports in order to show how we can override nginx to proxy two applications on the same host.
- Full code available: https://github.com/lambrospetrou/aws-playground/tree/master/elastic-beanstalk-al2-go/multi-process
This is how the directory structure looks like after running make:
➜  multi-process git:(master) find . -type f
./app/go.mod
./app/main.go
./Makefile
./.ebextensions/awslogs.config
./build/bin/app
./build/bundle.zip
./build/.ebextensions/awslogs.config
./build/Procfile
./build/.platform/nginx/conf.d/01_proxy.conf
./build-tools/Procfile
./.platform/nginx/conf.d/01_proxy.conf
Procfile
web: bin/app -name web
bgapp: bin/app -name bgapp -port 5001
Application code (main.go)
Exactly the same as before.
What happens?
We have a process named web which is the same as before starting the server at given PORT (5000), and also a second process named bgapp which starts the same server at port 5001 explicitly. As I mentioned in the Procfile section only the server at port 5000 will actually receive requests by default, so we need to override the nginx configuration to route traffic accordingly.
We do this by providing .platform/nginx/conf.d/01_proxy.conf:
server {
    server_name .elasticbeanstalk.com;
    listen 80;

    location /web2 {
        proxy_pass http://127.0.0.1:5001;
        proxy_set_header Host $host;
        proxy_set_header X-Real-IP $remote_addr;
    }

    location / {
        proxy_pass http://127.0.0.1:5000;
        proxy_set_header Host $host;
        proxy_set_header X-Real-IP $remote_addr;
    }
}
When Beanstalk starts the nginx service it automatically includes all .conf files in .platform/nginx/conf.d/ and therefore our configuration above will be used. What it does is basically route any request under the /web2 path to our server named bgapp, and anything else goes to the main server named web (remember our Procfile).
Logging
Unfortunately Elastic Beanstalk has some rough edges, and logging is one of those. When we only have a single web process everything is fine and as we saw above all the logs we need are automatically streamed to CloudWatch Logs (if enabled). The issue is when we have more than one process, e.g. in our current scenario where we also have the bgapp process.
After reading the following resources I realised I need to provide a custom configuration file to install AWS CloudWatch Logs agent and set it up to stream the additional bgapp.stdout.log file to CloudWatch Logs.
- https://aws.amazon.com/premiumsupport/knowledge-center/elastic-beanstalk-customized-log-files/
- https://docs.aws.amazon.com/elasticbeanstalk/latest/dg/AWSHowTo.cloudwatchlogs.html#AWSHowTo.cloudwatchlogs.streaming.custom
You can find the .ebextensions/awslogs.config file I used at https://github.com/lambrospetrou/aws-playground/blob/master/elastic-beanstalk-al2-go/multi-process/.ebextensions/awslogs.config.
NOTE1: The default IAM role created by Elastic Beanstalk for web services, AWSElasticBeanstalkWebTier, does not include the logs:CreateLogGroup permission which is needed for the creation of the /var/log/bgapp.stdout.log log group so make sure to update the IAM role used by the instance to include that. The default log groups (e.g. for /var/log/web.stdout.log) are created by the Elastic Beanstalk service automatically hence why the role used by the EC2 instance does not (need to) have this permission. But since we are now adding custom logs to be streamed to CloudWatch Logs we need to attach explicit permissions to allow the creation of the log group as well.
NOTE2: I opened a roadmap feature request to the Beanstalk team to make this automatically for all processes inside the Procfile since it doesn’t make any sense to me to have to do this on my own since it’s already done for the web process.
Conclusion
AWS Elastic Beanstalk is simple, and flexible enough to do anything I want. When AWS Lambda cannot be used, this is my goto platform.
In this article I put everything I had in my notes from using Elastic Beanstalk in my own projects over the years. There are some rough edges but the main issue I encounter is that the documentation is spread all over the place. Having this information structured makes it a bit easier to use and troubleshoot things.
In the worst case, even if nobody else needs this, future me will be very happy I took the time to write this down 😎
References
- For all platforms based on Amazon Linux 2
- For Go platform